Deployment and Maintenance / Deploying on Raspberry Pi Official System
This document mainly introduces how to run this system on a Raspberry Pi installed with the official Raspberry Pi OS.
Always use the latest version of DataFlux Func for operations
It is recommended to use a wired network connection to the Raspberry Pi during the operation process
This article is based on operations performed on a Raspberry Pi 4B 8GB version. The Raspberry Pi 3B is too weak to run
1. Preparations
Some preparations are needed before installing DataFlux Func on the Raspberry Pi.
1.1 Flashing the Raspberry Pi SD Card
It is recommended to use a clean official image to flash the SD card before installing DataFlux Func.
When flashing the SD card, you can choose:
-
Use the official
Raspberry Pi Imagertool for flashing -
Directly download the official
Raspberry Pi OSimage and use a third-party tool to flash
After flashing is complete, insert the SD card into the Raspberry Pi, power it on, and start it up.
1.2 Enabling ARM 64-bit Mode
The official Raspberry Pi OS does not enable 64-bit mode for backward compatibility reasons. However, for products after Raspberry Pi 3B, enabling 64-bit mode is supported.
You can use the following command to open the Raspberry Pi configuration:
| Bash | |
|---|---|
1 | |
And add the following content to indicate enabling ARM 64-bit mode:
| Text Only | |
|---|---|
1 | |
Save and restart the Raspberry Pi.
After restarting, you can use the following command to confirm:
| Bash | |
|---|---|
1 | |
The output is as follows:
| Text Only | |
|---|---|
1 | |
2. Installing DataFlux Func
The process of installing DataFlux Func on a Raspberry Pi is basically the same as installing it on a regular server.
2.1 Download
The download operation is the same as on other platforms. Use the following command. The script will detect the current environment architecture and download the ARM version resources.
| Bash | |
|---|---|
1 | |
If you need to download the DataFlux Func installation package suitable for Raspberry Pi on a PC, you need to specify --aarch64 in the download command
| Bash | |
|---|---|
1 | |
2.2 Installation
After the download is complete, enter the downloaded directory and execute the following command to install:
| Bash | |
|---|---|
1 | |
2.3 Initializing the System
After installation is complete, use a browser to open the DataFlux Func initialization page for operations.
- When on the Raspberry Pi itself, access
http://127.0.0.1:8088 - When accessing the Raspberry Pi from another device, access
http://{Raspberry Pi IP}:8088
2.4 Confirming Installation
After installation is complete, log in to the system, go to "Manage / About", and you can see that the "Architecture" is aarch64:
Subsequent operations are no different from DataFlux Func installed on a regular server.
3. Configuring WI-FI Connection
If you want the Raspberry Pi to connect to the network via WI-FI after installing DataFlux Func, please read this chapter
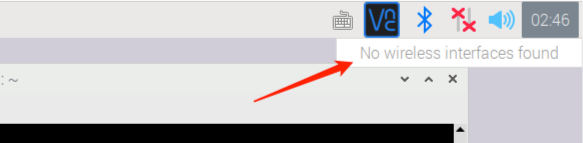
After installing DataFlux Func, the WI-FI control panel in the Raspberry Pi taskbar may display No wireless interfaces found,
and you cannot connect to WI-FI via the UI. Meanwhile, wired connections can access the network normally.
This issue has been discovered during testing, but the cause is not yet clear. However, it does not affect wired connections
3.1 Fixing the Raspberry Pi WI-FI Issue
To fix this issue, you can open the network configuration:
| Bash | |
|---|---|
1 | |
Add the following configuration:
| Bash | |
|---|---|
1 2 3 4 5 | |
Save and restart the Raspberry Pi.
3.2 Confirming the Issue is Fixed
Use the following command to confirm the WI-FI module:
| Bash | |
|---|---|
1 | |
The output content is:
| Text Only | |
|---|---|
1 2 3 4 5 6 7 8 | |
Use the following command to confirm the WI-FI network connection:
| Bash | |
|---|---|
1 | |
The output content is:
| Text Only | |
|---|---|
1 2 3 4 5 6 7 8 | |
Finally, open a browser. If you can access the internet normally, it indicates the WI-FI issue has been fixed.
You can also directly use cURL to verify if the network connection is successful:
| Bash | |
|---|---|
1 | |
Even if the WI-FI issue is fixed, the WI-FI control panel in the taskbar may still display No wireless interfaces found
X. Appendix
Content related to Raspberry Pi is recorded here for reference.
X.1 Maximizing Raspberry Pi Performance
Open the /boot/config.txt file
| Bash | |
|---|---|
1 | |
Add the following content as needed:
| Text Only | |
|---|---|
1 2 3 4 5 | |
It can be used normally even without the above settings, and a metal case alone can achieve passive cooling
This setting involves overclocking. When running at full load, passive cooling with just a metal case is not sufficient; at least a fan is required
More aggressive configurations can further improve Raspberry Pi performance, but will void the warranty
If your Raspberry Pi is damaged due to overclocking, the author of this article bears no responsibility. Please think twice before proceeding
X.2 Raspberry Pi Stress Test Program
You can use the Raspberry Pi stress test tool to test the operational stability of the Raspberry Pi (especially after overclocking)
Pull the project repository
| Bash | |
|---|---|
1 | |
The original author's GitHub repository address is: github.com/xukejing/rpi-cpu-stress
Add executable permissions
| Bash | |
|---|---|
1 2 | |
Start the stress test
| Text Only | |
|---|---|
1 | |
Then, you can see the following output in the terminal:
| Text Only | |
|---|---|
1 2 3 4 5 6 7 8 9 10 11 | |
a72 freq: 2100000: Indicates the current CPU frequency is 2.1Ghztemp: 50634: Indicates the temperature is 50.634 degrees Celsius
Do not let the Raspberry Pi stay at high temperatures (above 80 degrees Celsius) for long periods